This quest is given by Ludo.
Enter the monastery and talk to Headmaster Zhan.
Reward
- 250 Experience
- 20 Gold
This quest is given by Headmaster Zhan.
Talon is in the northwest of the vale.
Reward
- 100 Experience
- 10 Gold
This quest is given by Talon Silverwing.
After accepting this quest talk to Talon Silverwing once again to start the duel, he will attack you as soon as you talk to him again so be prepared.
Right as he is about to die he turns friendly and you can turn in the quest.
Reward
- 1,000 Experience
- 50 Gold
![]() 4. Track Down Weng Gha
4. Track Down Weng Gha
This quest is given by Talon Silverwing.
Travel southwest until you reach Tsumei Village. Enter, and exit to the south. Weng Gha is close by, westwards.
Reward
- 600 Experience
- 50 Gold
![]() 5. The Crop Thieves
5. The Crop Thieves
This quest is given by Weng Gha.
After you accept this quest, follow the path leading to Tsumei Village. When you near the marked spot on the mini-map 3 Crop Thieves dressed like the Crimson Skull appear. Kill them and then return to Weng Gha.
Reward
- 1,500 Experience
- 100 Gold
- Monastery Credit
![]() 1. Seek Out Headmaster Greico
1. Seek Out Headmaster Greico
This quest is given by Ludo.
Enter the monastery and talk to Headmaster Greico.
Reward
- 250 Experience
- 20 Gold
![]() 2. Locate Sujun
2. Locate Sujun
This quest is given by Headmaster Greico
Sujun can be found near the middle of Sunqua Vale.
Reward
- 100 Experience
- 10 Gold
![]() 3. Free The Fur
3. Free The Fur
This quest is given by Sujun.
After accepting the quest, simply follow Sujun to each of the Rabbit Cages. Click on each of them to free the rabbits held inside. After freeing the second rabbit, a level 6 Hungry Kappa will show up. It must be defeated. With Sujun helping, it shouldn't be difficult. After three rabbits are freed, the quest is complete.
Reward
- 1,000 Experience
- 50 Gold
![]() 4. Track Down Zho
4. Track Down Zho
This quest is given by Sujun.
Travel northwest from Sujun through the mountains until you reach Kinya Province. Once there, go a short distance northwest and you will find Zho.
Reward
- 600 Experience
- 50 Gold
![]() 5. The Yeti Hunt
5. The Yeti Hunt
This quest is given by Zho.
Talk with Zho, then follow her south to the yeti. It's level 10 but alone, so should be an easy kill for a full party. You won't have enough time to put down more than one trap, so don't be bothered really.
Reward
- 1,500 Experience
- 100 Gold
- Monastery Credit
![]() 1. Seek Out Headmaster Amara
1. Seek Out Headmaster Amara
This quest is given by Ludo.
Enter the monastery and talk to Headmaster Amara.
Reward
- 250 Experience
- 20 Gold
![]() 2. Locate Sister Tai
2. Locate Sister Tai
This quest is given by Headmaster Amara.
Exit Shing Jea Monastery and head Northwest in Sunqua Vale until you reach Yundin Circle. You will encounter Mantid Drones on the way, but they will not attack unless you attack them first. Speak to Sister Tai to receive your reward.
Reward
- 100 Experience
- 10 Gold
![]() 3. Stale Mate
3. Stale Mate
This quest is given by Sister Tai.
In theory you should complete this quest through the correct application of healing and protection spells. However, the easiest way to complete the quest is to simply aggro the enemy warrior yourself. Sister Tai will heal you from the warrior's attacks and you can simply wait out the timer. This method is especially useful for Warriors taking a Monk Secondary, as they have less energy and less energy regeneration.
You can also complete the quest by dealing enough damage to the hostile Warrior Student so that he turns non-hostile. An easier way for warriors would be to simply attack the enemy monk student until he is no longer hostile.
Reward
- 1,000 Experience
- 50 Gold
![]() 4. Track Down Brother Pe Wan
4. Track Down Brother Pe Wan
This quest is given by Sister Tai.
Pe Wan can be found just on the other side of the portal from Sunqua Vale.
Reward
- 600 Experience
- 50 Gold
![]() 5. Seeking A Cure
5. Seeking A Cure
This quest is given by Brother Pe Wan.
The two ingredients are shown by compass markers just north of where you start. There are a few low-level enemies you might encounter on the way, but you only need to bring the quest items to Brother Pe Wan. The items must be collected in order, and can only be collected after receiving the quest. The Nong Berries are located just across the bridge from the Tomaat Pass sign; the Tai Ling Buds are located near a sign for Seijun Woods.
Reward
- 1,500 Experience
- 100 Gold
- 1 Monastery Credit
![]() 1. Seek Out Headmaster Kuju
1. Seek Out Headmaster Kuju
This quest is given by Ludo
Enter the monastery and talk to Headmaster Kuju.
Reward
- 250 Experience
- 20 Gold
![]() 2. Locate Reng Ku
2. Locate Reng Ku
This quest is given by Headmaster Kuju
Simply walk from Shing Jea Monastery into Sunqua Vale and speak to Reng Ku in the north.
Reward
- 100 Experience
- 10 Gold
![]() 3. Little Creatures
3. Little Creatures
This quest is given by Reng Ku
The entrance to the temple is east from Reng Ku's location. Inside there will be two mantids. Killing a mantid will cause another to spawn. After five mantids have been killed, the Queen Mantid will drop down. Kill it and return to Reng Ku for your reward.
Reward
- 1,000 Experience
- 50 Gold
![]() 4. Track Down Su
4. Track Down Su
This quest is given by Reng Ku
Su is in the south of Panjiang Peninsula, outside Raiyan Cave.
Reward
- 600 Experience
- 50 Gold
![]() 5. Reaping The Naga
5. Reaping The Naga
This quest is given by Su
Follow Su through Raiyan Cave and help kill all the Naga. Li Yun and Soon Kim, two other necromancer students, will assist you as allies. Be warned, several Naga will cast Spirit Rift, which may be deadly to your party if you do not move out of its range. Also, avoid running ahead and aggroing more Naga than you can handle. In fact, it may be safer to let Su led the way, the better to demonstrate her Powers.
Reward
- 1,500 Experience
- 100 Gold
- Monastery Credit
![]() 1. Seek Out Headmaster Kaa
1. Seek Out Headmaster Kaa
This quest is given by Ludo
Enter the monastery and talk to Headmaster Kaa
Reward
- 250 Experience
- 20 Gold
![]() 2. Locate Mei Ling
2. Locate Mei Ling
This quest is given by Headmaster Kaa
Mei Ling can be found midnorth of Sunqua Vale, at the foot of the mountains.
Reward
- 100 Experience
- 10 Gold
![]() 3. Cleansing the Shrine
3. Cleansing the Shrine
This quest is given by Mei Ling
Follow the quest arrow to the Shrine of Maat and kill any enemies that attack your party on the way. You'll know you're at the Shrine if you see a couple of NPCs outside of the temple talking about Brother Sitai. Brother Sitai is located in the Shrine of Maat itself, and you'll notice he has a hex on him. Simply target Brother Sitai and use a hex removal skill on him, and the quest will be completed.
Reward
- 1000 Experience
- 50 Gold
![]() 4. Track Down Lo Sha
4. Track Down Lo Sha
This quest is given by Mei Ling
Travel northwest from Sujun through the mountains until you reach Kinya Province. Once there, go a short distance southwest and you will find Lo Sha.
Reward
- 600 Experience
- 50 Gold
![]() 5. Lo Sha's Gift
5. Lo Sha's Gift
This quest is given by Lo Sha
Follow the marker to the camp, it's just south of the exit to Sunqua Vale. Kill all Crimson Skull, make sure to bring a full party for this purpose, henchmen will do. Open the chest. No key required. Then just bring back the box.
Reward
- 1,500 Experience
- 100 Gold
- Monastery Credit
![]() 1. Seek Out Headmaster Vhang
1. Seek Out Headmaster Vhang
This quest is given by Ludo
Enter the monastery and talk to Headmaster Vhang
Reward
- 250 Experience
- 20 Gold
![]() 2. Locate Ronsu
2. Locate Ronsu
This quest is given by Headmaster Vhang
Ronsu can be found in the southern parts of Sunqua Vale, not far from the water.
Reward
- 100 Experience
- 10 Gold
![]() 3. Spark of Interest
3. Spark of Interest
This quest is given by Ronsu
Just go south to the sea, and out the pier. Huan should not be difficult, and if he is, fetch some allies from Shing Jea Monastery to help. Henchmen should do fine.
Reward
- 1,000 Experience
- 50 Gold
![]() 4. Track Down Kai Ying
4. Track Down Kai Ying
This quest is given by Ronsu
Kai Ying can be found just south of Kaitan Village.
Reward
- 600 Experience
- 50 Gold
![]() 5. Sparring Elements
5. Sparring Elements
This quest is given by Kai Ying
The combat is direct, and the only objective is to kill. If you have difficulty, nothing prevents you from bringing a full party to help you with this 'duel'.
Reward
- 1,500 Experience
- 100 Gold
- Monastery Credit
![]() 1. Seek Out Headmaster Lee
1. Seek Out Headmaster Lee
This quest is given by Ludo
Enter the monastery and talk to Headmaster Lee
Reward
- 250 Experience
- 20 Gold
![]() 2. Locate Jinzo
2. Locate Jinzo
This quest is given by Headmaster Lee
Map travel to Shing Jea Monastery and speak with Headmaster Lee to obtain the quest. Exit Shing Jea Monastery and run north towards Sunqua Vale. You will find Jinzo standing in front of a large stone wall by the side of the road.
Reward
- 100 Experience
- 10 Gold
![]() 3. Opening Strike
3. Opening Strike
This quest is given by Jinzo
Map travel to Shing Jea Monastery and talk to Headmaster Lee. Walk outside Shing Jea Monastery to Sunqua Vale. Then head up north, and walk for about 1 minute to reach Jinzo. Talk to Jinzo again to start the quest proper. Simply kill the five Bone Horrors as they appear to complete the quest. Vun Ying, your fellow student, will help you out.
Rewards
- 1,000 Experience
- 50 Gold
![]() 4. Track Down Panaku
4. Track Down Panaku
This quest is given by Jinzo
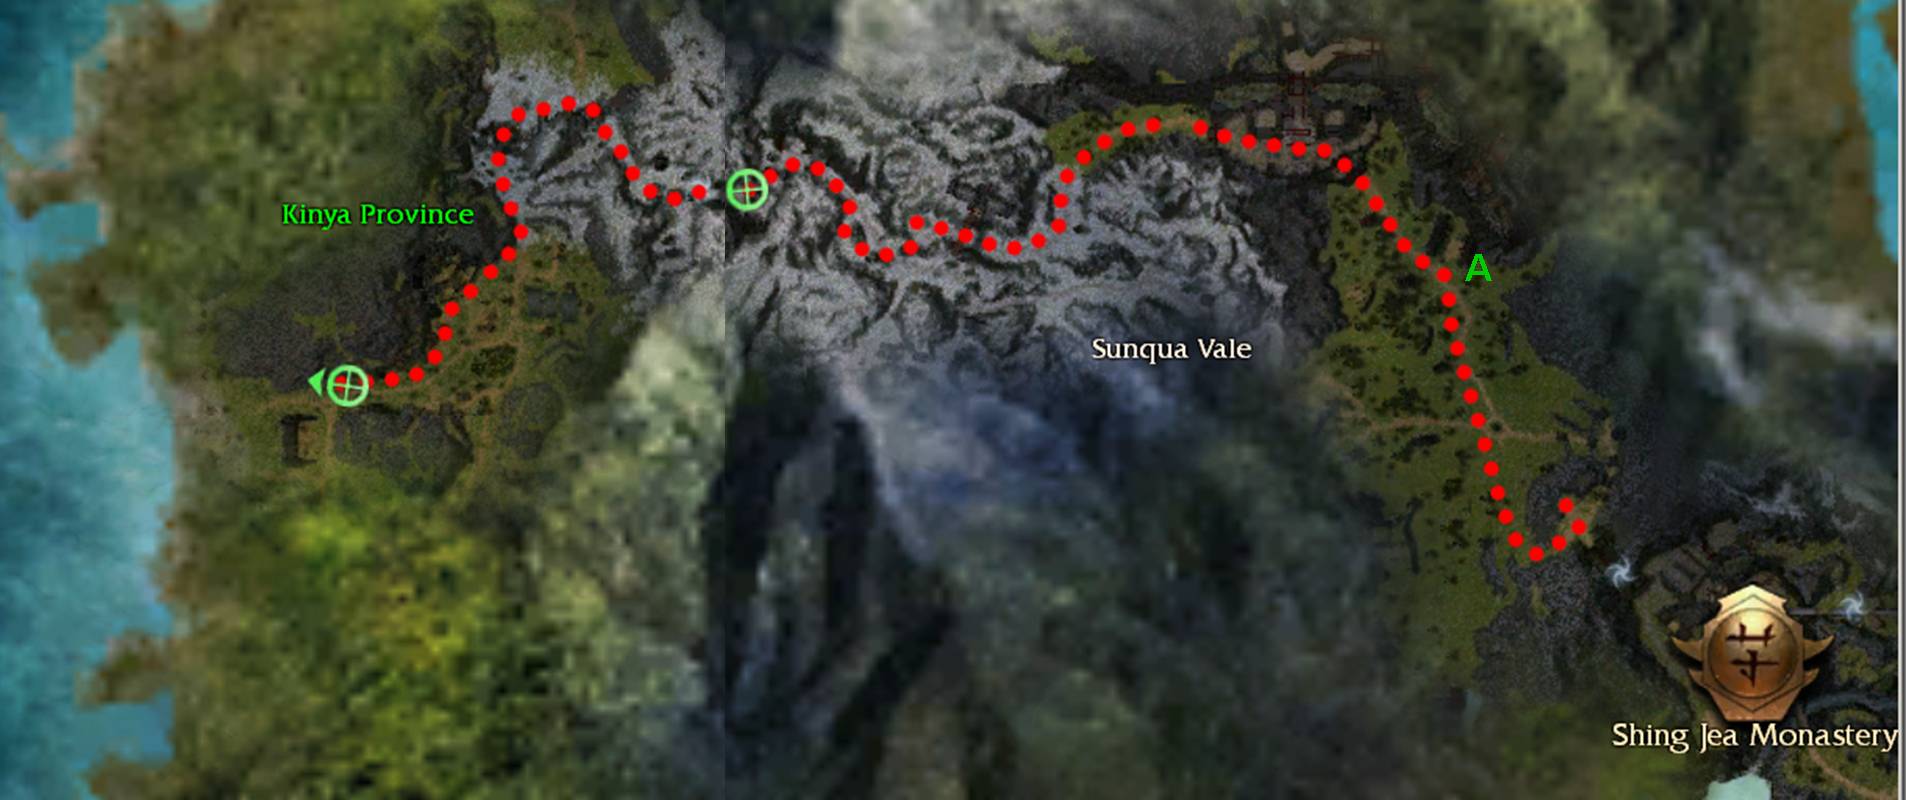
After completing the Opening Strike quest, speak with Jinzo at point A on the map. After accepting this quest, take the path to the north-west, then west through the courtyard of Minister Cho's Estate. Just past the courtyard you will encounter a group of 2-3 Crimson Skull. You'll find two more groups further down the path, along with a boss, Yingko the Skull Claw. Take care of them (or wait until the way is clear) and continue through Tomaat Pass to Kinya Province; following the path on the map until you reach Panaku.
Reward
- 600 Experience
- 50 Gold
![]() 5. Dual Strike
5. Dual Strike
This quest is given by Panaku
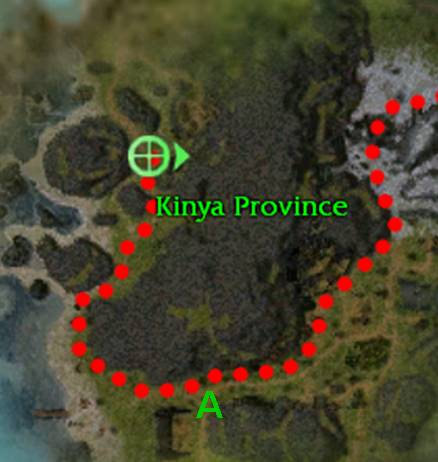
After setting your new skills in your skillbar, talk to Panaku at point A on the map and go west towards the beach. At the beach turn right (north). You will see a group of Naga there, kill those and continue by following the road on your right hand (going east at first then north again). Here Panaku will speak again twice. As you approach Swift Honorclaw he will taunt you and then turn hostile. Kill him and speak to Panaku to collect your reward.
Reward
- 1,500 Experience
- 100 Gold
- Monastery Credit
![]() 1. Seek Out Headmaster Quin
1. Seek Out Headmaster Quin
This quest is given by Ludo
Enter the monastery and talk to Headmaster Quin
Reward
- 250 Experience
- 20 Gold
![]() 2. Locate Professor Gai
2. Locate Professor Gai
This quest is given by Headmaster Quin
Gai can be found in Sunqua Vale, southwest of the exit from the monastery. Look for Kaabo Cemetery if you have trouble finding him.
Reward
- 100 Experience
- 10 Gold
![]() 3. Minions Gone Wild
3. Minions Gone Wild
This quest is given by Professor Gai
Talk to Professor Gai and receive skills. When you talk to Professor Gai again, a level 3 Wild Minion will appear nearby for you to kill, another after the first dies, and so on until you have killed all 5.
Reward
- 1000 Experience
- 50 Gold
![]() 4. Track Down Ang the Ephemeral
4. Track Down Ang the Ephemeral
This quest is given by Professor Gai
Ang is located near Qi Falls. To get there, make your way to Tsumei Village. Exit the town heading south west, then west until you get to the spirit.
Reward
- 600 Experience
- 50 Gold
![]() 5. Shackled Spirits
5. Shackled Spirits
This quest is given by Ang the Ephemeral
Follow the green markers and open the Soul Keepers, disposing of each spirit beofre moving on to the next. The spirits are fairly harmless, and Ang will heal you if needed.
Reward
- 1,500 Experience
- 100 Gold
- Monastery Credit
6. An Audience with Master Togo
This quest is given by the NPC from step 5 of the primary profession you chose.
Travel to Shing Jea Monastery. Now exit to the east, into Linnok Courtyard. Master Togo can be found in the middle of it. Talk to him. Pick the secondary profession you wish to have and take that quest. Now, do the appropriate 5-quest cycle from above for your chosen secondary profession. The initial quest will have the name convention "[Speak with] Headmaster Name (Profession)" instead of "[Seek Out] Headmaster Name." The subsequent quests will be the same. These steps will comprise numbers 7 through 11.
12. Choose your Secondary Profession
This quest is given by Master Togo
Talk to Master Togo and select which secondary profession you want, then speak with him again for the quest reward if you wish to keep the chosen profession. If you are unsure about whether you wish to keep this secondary profession, you may choose not to take the reward, giving you the chance to choose again if able.
Reward
- 3,500 Experience
- 250 Gold
- Monastery Credit
No comments:
Post a Comment