Friday, April 13, 2012

Factions Walkthrough (Part 3: Early Kaineng City)

1. A Master's Burden

This quest is given by First Mate Xiang in Seitung Harbor

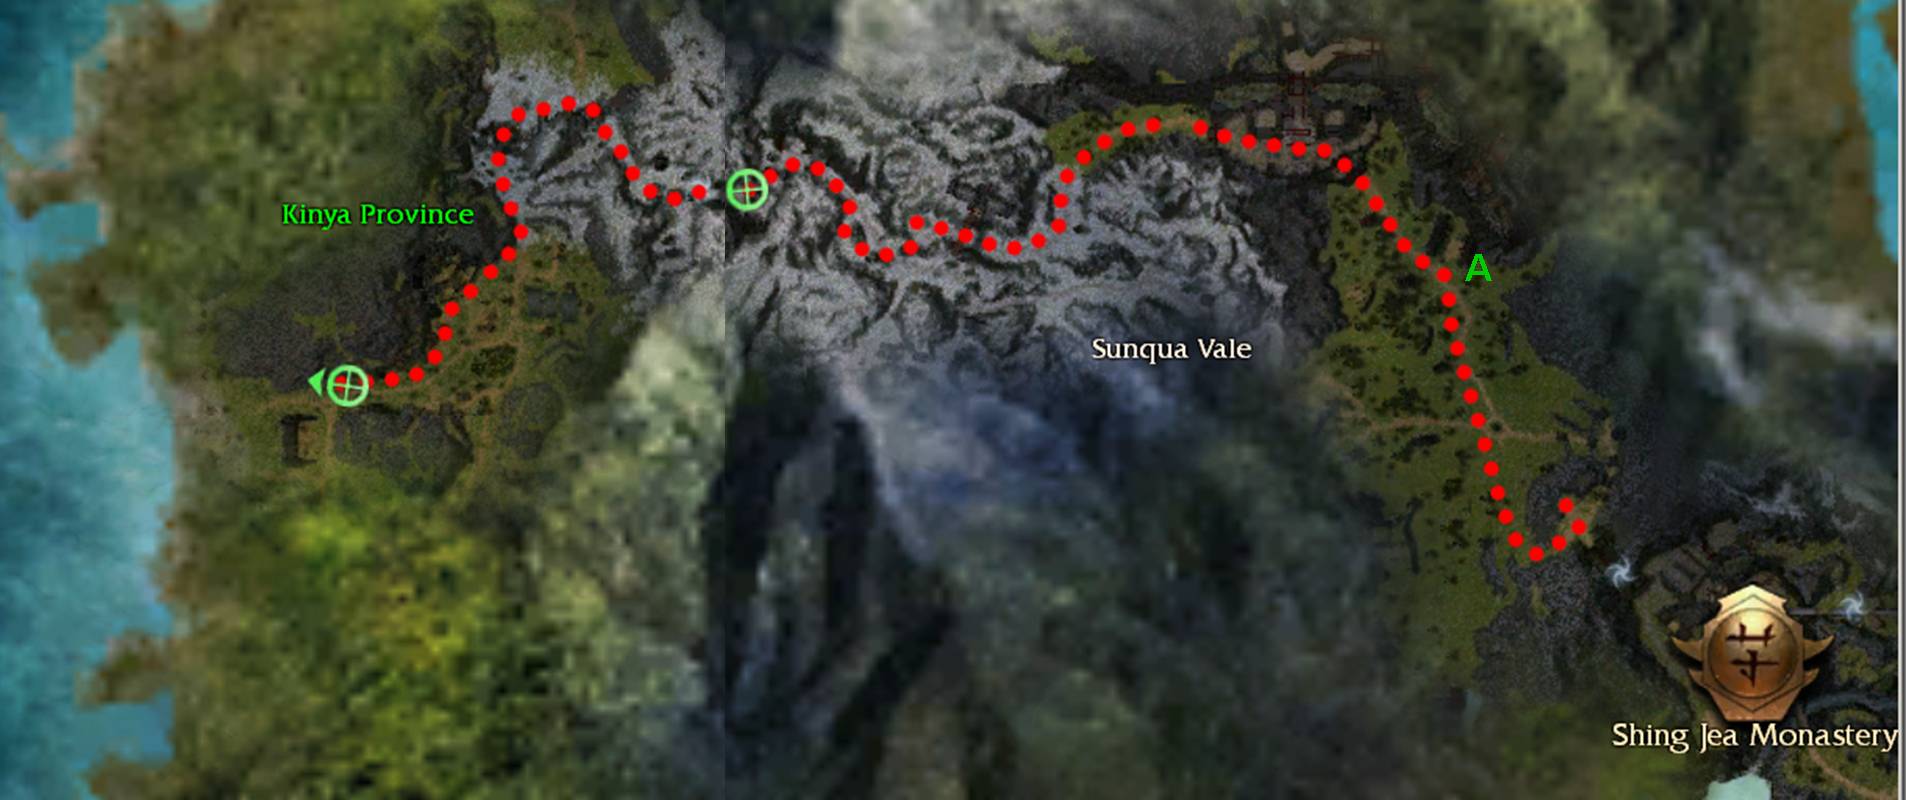
Speak with First Mate Xiang to arrange travel to Kaineng Docks. As soon as you arrive, speak with Headmaster Greico and enter The Marketplace, where you can increase your party size to 8. Exit to Wajjun Bazaar and follow the map to Master Togo. As always, move slowly enough to avoid over-aggroing.

After speaking with Togo, turn around and follow the map to Jia (if you encounter Am Fah along the way, take out their healers first). Map back to The Marketplace and return to the docks to accept the quest reward from Greico.

Reward

2. Mayhem in the Market

Follow the quest marker on the compass; there are no additional enemies from the quest. However, the Undercity can be difficult for players new to high level areas. Make sure to bring plenty of defensive skills. High-leveled Afflicted patrol the areas, along with Am Fah popups. Some might find it easier to enter the Undercity from Bukdek Byway.

Reward

Characters coming to Factions from another campaign will meet up with us here after completing Welcome to Cantha.This is the first of two 16 player co-operative PvE missions in the Factions Campaign. If you made a Canthan character you will be starting from Vizunah Square Local, and if you have a character from Tyria you will be starting from Vizunah Square Foreign.The Local group starts out with Master Togo, and the Foreign group starts out with Brother Mhenlo. The main difference is that they both start from different places. The local group takes care of a couple of groups of afflicted while the Foreign group rushes in to meet them, killing a few pesky Am Fah along the way. After both of the groups meet, the Afflicted groups start to grow in numbers and the mission starts to increase in difficulty. I would advise your monks to keep an eye out on Mhenlo and Togo as they tend to be targeted due to the sheer number of Afflicted. After clearing the first area from the Afflicted creatures, the Northeast gate will open. Follow Mhenlo and Togo through it until you come to the next area. There will be more afflicted popping up from every direction here, so be sure your monks are on their toes. After clearing this area, proceed North, across the bridge and then South again until you come to the third area. This is probably the hardest of the 4 parts to this mission, be sure to coordinate your efforts with your teammates, and have your monks make it known if they are short on energy.


After clearing this area, proceed south and follow the path until you find the Shiro'ken monster surrounded by a number of Afflicted creatures. Whatever you do don't bunch up on the bridge - the elementalists will shred everyone on your team to pieces. Instead pull them over to the bridge, body block the warriors and have your casters do the dirty work. After defeating everyone in this area, the mission is complete.

Standard Reward - over 30 minutes, 1000 Experience, 100 Gold, 1 Skill Point
Expert Reward - less than 30 minutes, 1500 Experience, 150 Gold, 1 Skill Point
Master Reward - less than 25 minutes, 2000 Experience, 200 Gold, 1 Skill Point


4. Finding The Oracle

This quest is given by Messenger Gosuh in Dragon's Throat

Exit Dragon's Throat into Shadow's Passage and talk to Brother Mhenlo. Then make your way to Nika in Bukdek Byway. You can either go to Bukdek Byway from Shadow's Passage or map travel to Kaineng Center, The Marketplace or Vizunah Square (Foreign Quarter) (if you're playing a non-Canthan character) and start from one of those.

Either way, proceed to the map marker giving Nika's location; when you approach her, she will begin her scripted dialogue with the Off-Duty Guards who are harassing her. Be careful when you approach her, as there are a number of patrolling Jade Brotherhood groups close by including the boss Kenshi Steelhand. Careful pulling should enable you to dispatch the groups individually, although you will probably find that Nika begins talking while you are fighting.

Reward

5. Closer to the Stars

This quest is given by Nika

Start out from The Marketplace and enter Wajjun Bazaar. Head straight west to find Fishmonger Bihzun. Once you talk to him a Jade Brotherhood Knight will approach and accost the Fishmonger. The Knight will turn hostile and several groups of Jade Brotherhood will come at you, one at a time. Defeat them and defend the Fishmonger.

Talk to the Fishmonger again, and he will tell you where to go. Head south to Nahpui Quarter and talk to Loud Kou to gain entrance.

Reward

6. Nahpui Quarter


Time to get "Weh no Su" Closer to the Stars. In this mission you will have to defeat 4 Celestial Creatures, Kaijun Don the Celestial Kirin, Kuonghsang the Celestial Turtle, Hai Jii the Celestial Phoenix and finally Tahmu the Celestial Dragon. First off you should keep in mind that whenever you kill a celestial creature, he will summon a bunch of smaller celestials all across the map. Pulling is an invaluable strategy on this map, so use it wisely. These smaller creatures regenerate a few minutes after being killed, therefore you should keep in mind that there is no turning around. I recommend killing them in the following order Phoenix, Turtle, Dragon, and finally the Kirin. The phoenix is easy, he's a sitting duck with only a few enemies guarding him. Kill him and follow the path South, East, and then North again until you spot Kuonghsang the Celestial Turtle. He is easy as well, just be sure to pull any patrols roaming the area. After defeating him proceed North, Northeast until you spot the Dragon. Again, pulling the patrolling groups away from the celestials will make your life much easier. After defeating the Dragon you should be seeing a lot of celestial groups as you proceed North, Northwest. Defeat them all until you spot Kaijun Don, the Celestial Kirin. Just in case you are wondering why I recommended that you kill him last - it's because he is a healer. If you killed him first, you would have to deal with little healer kirins all over the place. The best way to tackle this last Celestial is to forget everything I told you about pulling and simply bum rush him. Of course, if you would like to take the more careful approach go ahead and pull what you can and get ready for one heck of a fight. The mission ends when the last Celestial falls.

Standard Reward - over 30 minutes, 1000 Experience, 100 Gold, 1 Skill Point
Expert Reward - less than 30 minutes, 1500 Experience, 150 Gold, 1 Skill Point
Master Reward - less than 25 minutes, 2000 Experience, 200 Gold, 1 Skill Point

7.
To Tahnnakai Temple

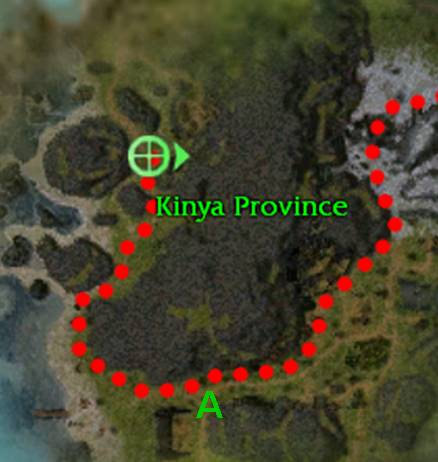
Exit Senji's Corner into Xaquang Skyway and make your way North, being careful not to aggro more than one group at a time. At the first bridge it's best to wait until you can see Orosen, Tranquil Acolyte. He will run down the bridge followed by his accompanying group. If you run back down to the two guards he will follow you all the way down. If you choose to fight this gives you the bonus of having the assistance of the guards and it will result in the enemies being crowded together. Another option is to move to the right side of the bridge (out of aggro range) and wait for the guards to die; the group will then continue on and you can skip fighting them. Continue northwards across the next bridge. At point 1 (see above image) be sure to pull each group separately back onto the bridge so as not to set off multiple groups. Continue into Shenzun Tunnels.

Follow the path to the east and then south killing any Am Fah you come across. Remember to watch out for the rangers who will no doubt have laid traps such as Viper's Nest and Spike Trap. Follow the quest marker to the east at the "T" junction and continue up to the entrance to the temple (2). Speak to the guard and Mhenlo will join you. At this point backtrack to the "T" junction and continue straight west. You can usually dodge the group of the Afflicted here but sometimes Mhenlo will set them off. Kill the group of Am Fah and head round to join up with Nika and Master Togo (3).

Here you will have to fend off the Afflicted. They come from three sides but there aren't many so you shouldn't have a problem. Sometimes the last group will get "stuck", head down the ramp and dispose of them to get the final dialog to appear.

Leave with Master Togo and backtrack again back to the entrance to the temple (2) and talk to the guard to head inside.

Reward

8. Tahnnakai Temple


Your objective in this mission is to prevent the Spirit Binder from consuming Vizu. To do so, you must fight your way to her and kill the bound bosses of Tahnnakai Temple in under 10 minutes. Every Bound boss that you kill will add a 2 minute time bonus to the limit, so as long as you move at a steady pace there is no need to hurry. From where you start, head Northeast where you will spot Bound Kitah, the Mesmer boss. Pull the Afflicted patrols away from him and be sure to target the monks first. After defeating Kitah, his spirit will open the gate to the next chamber where you will find Bound Naku, the Necromancer boss. Defeat him the same way you defeated the first boss, and continue through the level killing Bound Teinai the Elementalist, Bound Karei the Monk, Bound Jaizhanzu the Warrior, Bound Zojun the Ranger, and Bound Kaolai the Ritualist. After defeating Kaolai, proceed Northwest. You should spot Vizu in the middle of a large circular altar, guarded by a number of Afflicted. Clear out any patrols and slowly start pulling the Afflicted away from her. Defeat her to release her spirit and complete the mission.

Standard Reward - over 25 minutes, 1000 Experience, 100 Gold, 1 Skill Point
Expert Reward - less than 25 minutes, 1500 Experience, 150 Gold, 1 Skill Point
Master Reward - less than 20 minutes, 2000 Experience, 200 Gold, 1 Skill Point

9.
A Meeting With the Emperor

This quest is given by Emperor's Voice

Return to Tahnnakai Temple and talk to the emperor.

Reward

10. The Count's Daughter

This quest is given by Emperor's Voice

Enter Sunjiang District (explorable area) from Zin Ku Corridor, where Mhenlo will join your party. Follow the quest marker to Danika, fighting Am Fah along the way. Once you have talked to Danika you can map travel to Maatu Keep if you have it unlocked. If not, follow the quest marker to Pongmei Valley, fighting Am Fah and Afflicted along the way; once in Pongmei Valley follow the quest marker, watching out for the popup Ranger boss Meynsang the Sadistic (if you follow the quest marker directly), until you get to Danika and talk to her. After talking to Danika and Redemptor Karl, follow the quest marker to Tanglewood Copse. Once in Arborstone (explorable area) follow the quest marker to Lift Operator Shulz, being careful not to get stuck between the two groups of Wardens. Lift Operator Shulz will take you to Arborstone where you can collect the quest reward.

Reward

Tuesday, April 10, 2012

Factions Walkthrough (Part 2: Shing Jea Island)


1. A Formal Introduction

This quest is given by Master Togo

Head into Sunqua Vale from Shing Jea Monastery and speak to Master Togo. Simply follow Master Togo and Yijo Tahn to Minister Cho's Estate. When you arrive at the estate, speak to Guardsman Zui and a cutscene will begin. After the cutscene, your party will be in Minister Cho's Estate. Speak to Guardsman Kayao for your reward.

Reward

2. Minister Cho's Estate


This is somewhat of an orientation mission. Master Togo and Yijo Tahn will give new players to Guild Wars tips about various controls in the game. The Mission itself is a walk in the park. Simply follow Togo until; after afew sickened guards and the like meet their demise at your hands, you will eventually find Minister Cho. After speaking with him he will change into an Afflicted creature. Kill him to complete the mission.

3. Warning The Tengu

This quest is given by
Ang the Ephemeral

Players can find Aerie, the Angchu Village, West of Ran Musu Gardens. To reach the village, players should leave the Ran Musu Gardens from the South portal into Kinya Province and then follow the Western road past the North side of the mountain. Following the road as it veers South will lead players straight to the village.

When arriving at the village, players should speak with Soar Honorclaw. She will give instructions for the elimination of an Afflicted Assassin which can be found to the South west of the village. Talon Silverwing will accompany the players.

After speaking with Talon, players should follow the quest arrow and kill the Afflicted Creature. When the Afflicted Creature has been eliminated, players can return to the village and talk to Soar Honorclaw to collect the reward.

Reward

4. The Great Throws

This quest is given by Soar Honorclaw

This quest may seem difficult because of the groups of enemies you will be fighting, but it's really quite simple. Make your way to Kaitan Village but stay away from the quest marker to avoid spawning the enemies. Instead, wait on the left side of the NPCs and watch for the group of Canthan Guards to get close to the Kaitan Village sign. Once they are there, move to the NPCs and activate the spawns. If done correctly, the Level 20 Guards will kill the mobs for you and complete the quest.

An easy way to time this (and alleviate boredom) is to couple this mission with Cash Crops. Just avoid the quest marker (after kneeling at the appropriate places for Cash Crops), by circling to it from the South, and approach from the South-West.

If you walk to the peninsula right after receiving the quest from Soar Honorclaw, you can talk to Tahbo Paa near the map entrance to Panjiang Peninsula, to get the quest The Agriculturist. You also will have higher level henchmen if you walk from Ran Musu Gardens to the peninsula.

Reward

5. Journey to the Master

This quest is given by Sister Tai

Map travel to Shing Jea Monastery and go through the portal to Linnok Courtyard. Speak with Master Togo to collect your quest reward.

Reward

6. The Road Less Traveled

This quest is given by Master Togo

Begin the quest in Linnok Courtyard by speaking to Guard Tsukaro. He will transport you to Saoshang Trail. Following the path will lead you directly to Seitung Harbor. Brother Pe Wan will also lead the way. Stick close to him for extra healing.

Only about half of the enemies are visible when first entering; the rest are popup monsters. It is best to stay together to prevent a mass aggro.

Upon reaching Seitung Harbor, speak with Brother Pe Wan for your reward.

If you kill all mantids and get close to Seitung Harbor before talking to Brother Pe Wan he won't follow you. And if he gets ahead of you, and ends up getting killed, don't worry about it. You can still contact him in Seitung Harbor.

Reward

7. Looking For Trouble

This quest is given by Brother Pe Wan

Head out into Jaya Bluffs and go northwest, fighting hostile Tengu along the way. When you reach Zho and company, there will be three groups of Afflicted in a small monastery, the Sizhou Hall on a tall island. Eliminate them and claim your reward.

Reward

8. To The Rescue

This quest is given by Zho

Once you meet up with the four NPCs (Su, Sister Tai, Professor Gai, and Kai Ying) at the Linkei Township, you will be attacked by Sickened Guards and Afflicted from both sides after a short dialogue sequence. Although Professor Gai and Kai Ying will only attack with their staves, Sister Tai will heal your party with Orison of Healing and Su will cast Life Siphon on enemies. You will want to stay by these four throughout the quest to make sure you capitalize on their assistance; if any die, they cannot be resurrected and you will have to rezone to claim the reward and complete To Zen Daijun.

There are two methods to beating this quest. The first is to have your entire party sit by the four NPCs, and simply wait for the Afflicted to come to you; this can lead to chaotic battles that can become overwhelming. The other method is to take a more liberal approach, by moving your team away from the NPCs and take out the foes before they reach your colleagues; this method reduces the chaos of the battle, but requires that you keep a constant eye on your allies, lest they become overwhelmed (especially when the afflicted boss arrives). Both methods are well served by placing spirits (e.g. Pain or Favorable Winds) and traps in various locations.

Once you complete the quest, the four NPCs will follow you until you reach Zen Daijun. So if you do this quest first, it will make the other quests in Haiju Lagoon much easier, as the NPCs will continue to help you fight.

Reward

9. To Zen Daijun

This quest is given by Su

This quest should actually be quite easy. The map to the upper right shows the path you will take. Normally you only encounter 3 groups of 3-4 afflicted (level 12-15) each. Because you are helped by Su, Professor Gai, Sister Tai, and Kai Ying, killing these afflicted should not be a problem. For this reason, you should consider doing any of the area's secondary quests before completing this quest; they will also be much easier due to your larger party. Be cautious though, as Su must be alive when you finally reach Master Togo, or you will not be allowed into the next outpost (if there's a problem, Su is often the first of the four to die).

Reward

10. Zen Daijun

Your 2 objectives in this mission are to find the source of the plague and kill the afflicted bosses. (Afflicted Yijo, Afflicted Farmer Xeng Jo, and Afflicted Kana) Before we start be aware of the purplish like fog around this map. It is a disease called Vile Miasma, it spreads from one person to another, and wears off much quicker if you stop moving for a few seconds. From where you start, head West, Southwest and ring the bell at one of the nearby Shrines of Zunraa. Zunraa will help your party by removing any vile miasma anyone may have contracted. After you cross the bridge and go up the hill you should spot another Shrine of Zunraa. From here head North, Northwest and follow the path around the map until you come to a large bridge. You should see 2 of the bosses you need to kill standing on it. The third is inside the building at the end of the bridge. Proceed cautiously, pull out one group at a time and all will be well. Kill all three bosses to complete the mission.

11. Lost Treasure (Only for characters created in Factions)

This quest is given by Raitahn Nem in Ran Musu Gardens

This quest starts in Minister Cho's Estate (explorable area), from the northeastern exit from Ran Musu Gardens. Outside, you will meet Raitahn Nem who will join your party as an ally. Follow and defend him all the way to the quest marker. Once you have found Jaje Niya, the two will talk out their dialogue, after which you can speak with Raitahn Nem to obtain your reward.

Additional notes:

  • Nem is on a scripted path, so he is leading you, not the other way around. Be prepared for a wandering route.
  • Keep Nem within earshot at all times. He has been known to disappear entirely if he gets too far from your aggro bubble.
  • Note that he will sometimes pause and yawn. Sometimes he will run back and forth like he's lost. There's nothing to do but wait for him to get motivated onwards again.
  • Nem will often ignore enemies in his path until he has aggroed the next group. Be wary of this, and accept that it will happen.
  • Nem needs to be with you and alive at the end in order to talk to his "treasure", or you will not get credit for the quest.

Reward

12. An Unwelcome Guest (Only for characters created in Factions)

This quest is given by Kirin / Zunraa in Seitung Harbor

After accepting the quest from Zunraa, talk to Guard Lae Fao to enter Zen Daijun. Remember to bring skills that give health regeneration to counter the effects of the miasma.

In the explorable area, follow the quest markers to the spots where miasma needs to be cleared. To achieve that, you have to run through them so that Zunraa will follow and clear them. Consider flagging your henchmen away from the miasma before leading Zunraa through it, to minimize the health degeneration. If Zunraa dies, you can re-summon him at any of the bells that are found in several spots in the area.

Instead of running through the miasma and tagging Zunraa along, you can run in circles (whenever possible) around the miasma. The advantage being that you won't be affected, while Zunraa will try to follow you, remain in the miasma and clear it.

Once the miasma have all been cleared, the quest will update and point you towards the Daijun Library. Clear the miasma there and take down the Corrupted Zunraa to complete the quest.

One tactic is to clear the final miasma area before clearing the other areas (the Corrupted Zunraa doesn't appear until all other miasma have been cleared), that way when you battle the Corrupted Zunraa you won't also have to combat party wide health degeneration while fighting him.

Reward

Factions Walkthrough (Part 1: Getting Your Professions)

The first quest offered to a new character is the tutorial Mantid Hatchlings. For players already familiar with the game, you can skip the tutorial completely. Depending on the profession of your character, the chain of quests to be completed will be:

Warrior-icon-small.png1. Seek Out Headmaster Zhan

This quest is given by Ludo.

Enter the monastery and talk to Headmaster Zhan.

Reward

Warrior-icon-small.png2. Locate Talon Silverwing

This quest is given by Headmaster Zhan.

Talon is in the northwest of the vale.

Reward

Warrior-icon-small.png3. Talon's Duel

This quest is given by Talon Silverwing.

After accepting this quest talk to Talon Silverwing once again to start the duel, he will attack you as soon as you talk to him again so be prepared.

Right as he is about to die he turns friendly and you can turn in the quest.

Reward

Warrior-icon-small.png4. Track Down Weng Gha

This quest is given by Talon Silverwing.

Travel southwest until you reach Tsumei Village. Enter, and exit to the south. Weng Gha is close by, westwards.

Reward

Warrior-icon-small.png5. The Crop Thieves

This quest is given by Weng Gha.

After you accept this quest, follow the path leading to Tsumei Village. When you near the marked spot on the mini-map 3 Crop Thieves dressed like the Crimson Skull appear. Kill them and then return to Weng Gha.

Reward

Ranger-icon-small.png1. Seek Out Headmaster Greico

This quest is given by Ludo.

Enter the monastery and talk to Headmaster Greico.

Reward

Ranger-icon-small.png2. Locate Sujun

This quest is given by Headmaster Greico

Sujun can be found near the middle of Sunqua Vale.

Reward

Ranger-icon-small.png3. Free The Fur

This quest is given by Sujun.

After accepting the quest, simply follow Sujun to each of the Rabbit Cages. Click on each of them to free the rabbits held inside. After freeing the second rabbit, a level 6 Hungry Kappa will show up. It must be defeated. With Sujun helping, it shouldn't be difficult. After three rabbits are freed, the quest is complete.

Reward

Ranger-icon-small.png4. Track Down Zho

This quest is given by Sujun.

Travel northwest from Sujun through the mountains until you reach Kinya Province. Once there, go a short distance northwest and you will find Zho.

Reward

Ranger-icon-small.png5. The Yeti Hunt

This quest is given by Zho.

Talk with Zho, then follow her south to the yeti. It's level 10 but alone, so should be an easy kill for a full party. You won't have enough time to put down more than one trap, so don't be bothered really.

Reward

Monk-icon-small.png1. Seek Out Headmaster Amara

This quest is given by Ludo.

Enter the monastery and talk to Headmaster Amara.

Reward

Monk-icon-small.png2. Locate Sister Tai

This quest is given by Headmaster Amara.

Exit Shing Jea Monastery and head Northwest in Sunqua Vale until you reach Yundin Circle. You will encounter Mantid Drones on the way, but they will not attack unless you attack them first. Speak to Sister Tai to receive your reward.

Reward

Monk-icon-small.png3. Stale Mate

This quest is given by Sister Tai.

In theory you should complete this quest through the correct application of healing and protection spells. However, the easiest way to complete the quest is to simply aggro the enemy warrior yourself. Sister Tai will heal you from the warrior's attacks and you can simply wait out the timer. This method is especially useful for Warriors taking a Monk Secondary, as they have less energy and less energy regeneration.

You can also complete the quest by dealing enough damage to the hostile Warrior Student so that he turns non-hostile. An easier way for warriors would be to simply attack the enemy monk student until he is no longer hostile.

Reward

Monk-icon-small.png4. Track Down Brother Pe Wan

This quest is given by Sister Tai.

Pe Wan can be found just on the other side of the portal from Sunqua Vale.

Reward

Monk-icon-small.png5. Seeking A Cure

This quest is given by Brother Pe Wan.

The two ingredients are shown by compass markers just north of where you start. There are a few low-level enemies you might encounter on the way, but you only need to bring the quest items to Brother Pe Wan. The items must be collected in order, and can only be collected after receiving the quest. The Nong Berries are located just across the bridge from the Tomaat Pass sign; the Tai Ling Buds are located near a sign for Seijun Woods.

Reward

Necromancer-icon-small.png1. Seek Out Headmaster Kuju

This quest is given by Ludo

Enter the monastery and talk to Headmaster Kuju.

Reward

Necromancer-icon-small.png2. Locate Reng Ku

This quest is given by Headmaster Kuju

Simply walk from Shing Jea Monastery into Sunqua Vale and speak to Reng Ku in the north.

Reward

Necromancer-icon-small.png3. Little Creatures

This quest is given by Reng Ku

The entrance to the temple is east from Reng Ku's location. Inside there will be two mantids. Killing a mantid will cause another to spawn. After five mantids have been killed, the Queen Mantid will drop down. Kill it and return to Reng Ku for your reward.

Reward

Necromancer-icon-small.png4. Track Down Su

This quest is given by Reng Ku

Su is in the south of Panjiang Peninsula, outside Raiyan Cave.

Reward

Necromancer-icon-small.png5. Reaping The Naga

This quest is given by Su

Follow Su through Raiyan Cave and help kill all the Naga. Li Yun and Soon Kim, two other necromancer students, will assist you as allies. Be warned, several Naga will cast Spirit Rift, which may be deadly to your party if you do not move out of its range. Also, avoid running ahead and aggroing more Naga than you can handle. In fact, it may be safer to let Su led the way, the better to demonstrate her Powers.

Reward

Mesmer-icon-small.png1. Seek Out Headmaster Kaa

This quest is given by Ludo

Enter the monastery and talk to Headmaster Kaa

Reward

Mesmer-icon-small.png2. Locate Mei Ling

This quest is given by Headmaster Kaa

Mei Ling can be found midnorth of Sunqua Vale, at the foot of the mountains.

Reward

Mesmer-icon-small.png3. Cleansing the Shrine

This quest is given by Mei Ling

Follow the quest arrow to the Shrine of Maat and kill any enemies that attack your party on the way. You'll know you're at the Shrine if you see a couple of NPCs outside of the temple talking about Brother Sitai. Brother Sitai is located in the Shrine of Maat itself, and you'll notice he has a hex on him. Simply target Brother Sitai and use a hex removal skill on him, and the quest will be completed.

Reward

Mesmer-icon-small.png4. Track Down Lo Sha

This quest is given by Mei Ling

Travel northwest from Sujun through the mountains until you reach Kinya Province. Once there, go a short distance southwest and you will find Lo Sha.

Reward

Mesmer-icon-small.png5. Lo Sha's Gift

This quest is given by Lo Sha

Follow the marker to the camp, it's just south of the exit to Sunqua Vale. Kill all Crimson Skull, make sure to bring a full party for this purpose, henchmen will do. Open the chest. No key required. Then just bring back the box.

Reward

Elementalist-icon-small.png1. Seek Out Headmaster Vhang

This quest is given by Ludo

Enter the monastery and talk to Headmaster Vhang

Reward

Elementalist-icon-small.png2. Locate Ronsu

This quest is given by Headmaster Vhang

Ronsu can be found in the southern parts of Sunqua Vale, not far from the water.

Reward

Elementalist-icon-small.png3. Spark of Interest

This quest is given by Ronsu

Just go south to the sea, and out the pier. Huan should not be difficult, and if he is, fetch some allies from Shing Jea Monastery to help. Henchmen should do fine.

Reward

Elementalist-icon-small.png4. Track Down Kai Ying

This quest is given by Ronsu

Kai Ying can be found just south of Kaitan Village.

Reward

Elementalist-icon-small.png5. Sparring Elements

This quest is given by Kai Ying

The combat is direct, and the only objective is to kill. If you have difficulty, nothing prevents you from bringing a full party to help you with this 'duel'.

Reward

Assassin-icon-small.png1. Seek Out Headmaster Lee

This quest is given by Ludo

Enter the monastery and talk to Headmaster Lee

Reward

Assassin-icon-small.png2. Locate Jinzo

This quest is given by Headmaster Lee

Map travel to Shing Jea Monastery and speak with Headmaster Lee to obtain the quest. Exit Shing Jea Monastery and run north towards Sunqua Vale. You will find Jinzo standing in front of a large stone wall by the side of the road.

Reward

Assassin-icon-small.png3. Opening Strike

This quest is given by Jinzo

Map travel to Shing Jea Monastery and talk to Headmaster Lee. Walk outside Shing Jea Monastery to Sunqua Vale. Then head up north, and walk for about 1 minute to reach Jinzo. Talk to Jinzo again to start the quest proper. Simply kill the five Bone Horrors as they appear to complete the quest. Vun Ying, your fellow student, will help you out.

Rewards

Assassin-icon-small.png4. Track Down Panaku

This quest is given by Jinzo

File:Track Down Panaku map.jpg

After completing the Opening Strike quest, speak with Jinzo at point A on the map. After accepting this quest, take the path to the north-west, then west through the courtyard of Minister Cho's Estate. Just past the courtyard you will encounter a group of 2-3 Crimson Skull. You'll find two more groups further down the path, along with a boss, Yingko the Skull Claw. Take care of them (or wait until the way is clear) and continue through Tomaat Pass to Kinya Province; following the path on the map until you reach Panaku.

Reward

Assassin-icon-small.png5. Dual Strike

This quest is given by Panaku

File:Dual Strike map.jpg

After setting your new skills in your skillbar, talk to Panaku at point A on the map and go west towards the beach. At the beach turn right (north). You will see a group of Naga there, kill those and continue by following the road on your right hand (going east at first then north again). Here Panaku will speak again twice. As you approach Swift Honorclaw he will taunt you and then turn hostile. Kill him and speak to Panaku to collect your reward.

Reward

Ritualist-icon-small.png1. Seek Out Headmaster Quin

This quest is given by Ludo

Enter the monastery and talk to Headmaster Quin

Reward

Ritualist-icon-small.png2. Locate Professor Gai

This quest is given by Headmaster Quin

Gai can be found in Sunqua Vale, southwest of the exit from the monastery. Look for Kaabo Cemetery if you have trouble finding him.

Reward

Ritualist-icon-small.png3. Minions Gone Wild

This quest is given by Professor Gai

Talk to Professor Gai and receive skills. When you talk to Professor Gai again, a level 3 Wild Minion will appear nearby for you to kill, another after the first dies, and so on until you have killed all 5.

Reward

Ritualist-icon-small.png4. Track Down Ang the Ephemeral

This quest is given by Professor Gai

Ang is located near Qi Falls. To get there, make your way to Tsumei Village. Exit the town heading south west, then west until you get to the spirit.

Reward

Ritualist-icon-small.png5. Shackled Spirits

This quest is given by Ang the Ephemeral

Follow the green markers and open the Soul Keepers, disposing of each spirit beofre moving on to the next. The spirits are fairly harmless, and Ang will heal you if needed.

Reward

6. An Audience with Master Togo

This quest is given by the NPC from step 5 of the primary profession you chose.

Travel to Shing Jea Monastery. Now exit to the east, into Linnok Courtyard. Master Togo can be found in the middle of it. Talk to him. Pick the secondary profession you wish to have and take that quest. Now, do the appropriate 5-quest cycle from above for your chosen secondary profession. The initial quest will have the name convention "[Speak with] Headmaster Name (Profession)" instead of "[Seek Out] Headmaster Name." The subsequent quests will be the same. These steps will comprise numbers 7 through 11.

12. Choose your Secondary Profession

This quest is given by Master Togo

Talk to Master Togo and select which secondary profession you want, then speak with him again for the quest reward if you wish to keep the chosen profession. If you are unsure about whether you wish to keep this secondary profession, you may choose not to take the reward, giving you the chance to choose again if able.

Reward